

There has never been a more exciting time to be a Web3 and blockchain developer. Furthermore, an increase in high-quality education and advanced tooling is creating an environment for next-generation technologies to get to market quickly. If you’ve been learning how to build decentralized applications (dApps) and write smart contracts, you may have numerous dApp ideas that you want to bring to life. However, it can sometimes be daunting to put your programming skills to the test if it’s your first time. However, fear not! We’re going to share with you three simple dApp ideas to get you building in no time!
In this dApp ideas article, we’re going to show you how simple it is to create Ethereum dApps with Moralis. Also, we’ll guide you through each step of the process and show some of the advanced tools we must use to make these dApp ideas a reality!
Make sure to check out the Ethereum dApp Programming course at Moralis Academy! In this course, we teach students how to create a CryptoKitties NFT marketplace clone! Join our community of over 30,000 students today at Moralis Academy!
Easy dApp Ideas – Create a Crypto Wallet
Crypto wallets are essential for interacting with dApps. As such, we want to show you how you can build a crypto wallet in four easy steps with Moralis. To begin, we’ll create a Moralis server. Then, we’re going to structure our content with HTML and add JavaScript logic. Then, we’ll add transfer functions to our crypto wallet.
If you haven’t already, you need to sign up for a Moralis account. Once you’ve created an account and logged in, click on the “+ Create a new Server” button at the top right of the interface. From the drop-down menu, select the server you want and input the name, region, and networks. After this is complete, click “Add Instance” at the bottom right to spin up the server. This should only take a couple of minutes.
Structure the Content with HTML
Furthermore, we need to set up the structure for our web content using HTML code. In this example, we’re using two files. One file is for the sign-in page, and the other is for the dashboard. The login page should look something like this upon completion:
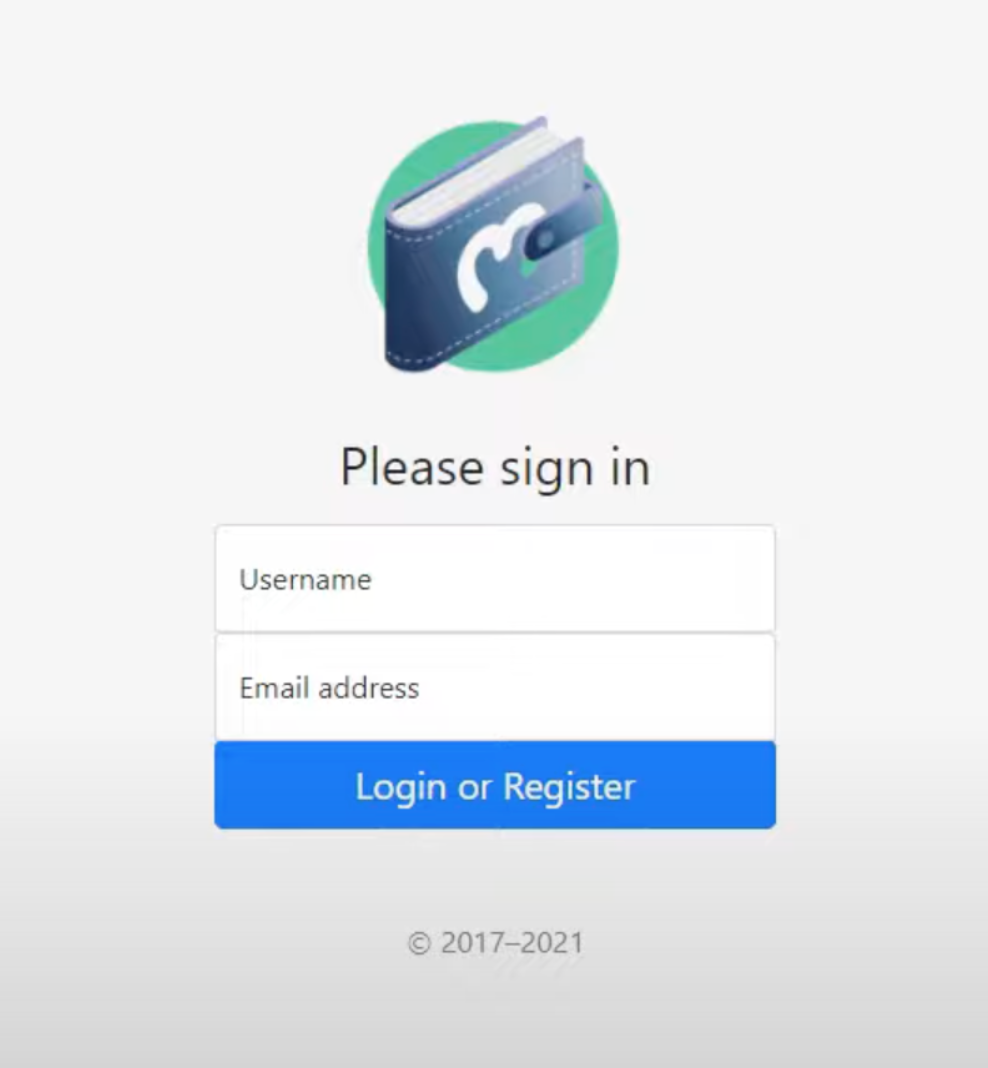
You can find the code for this page in Moralis’ GitHub repository in the “index.html” file. Also, this code uses a Bootstrap sign-in template. You can take this template and make modifications to it to suit the requirements of your own dApp. Next, we have the dashboard of the wallet, which looks like this:
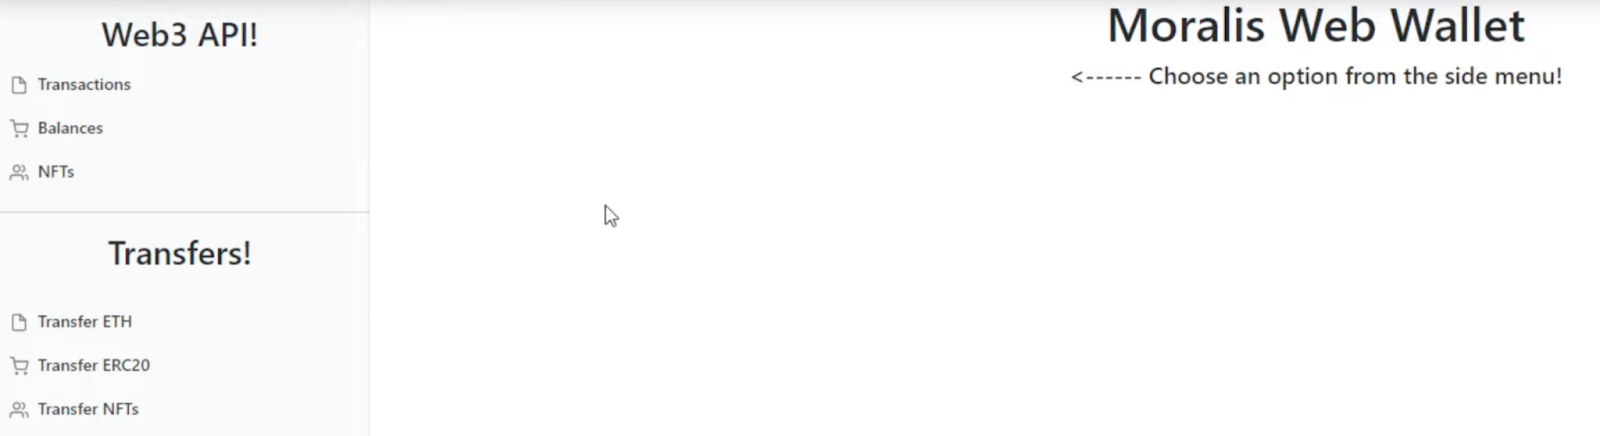
You can also find the code for the dashboard at the Moralis GitHub repository. As with the “index.html” file, the dashboard uses a Bootstrap template. Moreover, we connect our software development kit (SDK) to Moralis, which should look something like this:
<script src="https://cdn.jsdelivr.net/npm/web3@latest/dist/web3.min.js"></script>
<script src="https://npmcdn.com/[email protected]/dist/moralis.js"></script>
Most of the above code refers to the buttons and fields of the crypto wallet. We will reference these elements later when we write our JavaScript code. Furthermore, we can see some code that implements JavaScript files at the foot of the file to ensure our template works correctly.
JavaScript Logic
Our JavaScript file contains the logic we need for our dApp. The file is made up of several functions for our wallet. In this example, we’ll look at the core functions for transferring funds between accounts. However, you can find the complete file in our GitHub repository. Start by initializing Moralis and connecting the project to the Moralis server. Then, implement the code below:
Moralis.initialize(''YOUR_APP_ID'');

Moralis.serverURL = 'https://YOUR_MORALIS_SERVER:1337/server'
We need to fetch the app ID and server URL by navigating to the “Servers” tab and clicking “View details” on the Moralis admin panel. Then, we simply copy the two elements and paste them into our code. Also, because we’re using Moralis, it’s easy to create functions such as logging in and out or rendering content. All we need to do is implement the “Moralis.Web3.authenticate()” line, and we can avoid a number of complex, time-consuming tasks. Below, we can see how the login function should appear:
login = async () => {
    await Moralis.Web3.authenticate()
    .then(async function (user) {
        let _username = document.getElementById('user-username').value;
        let _email = document.getElementById('user-email').value;
        if(_username != '' || _email != ''){
            if(_username != ''){user.set("name", _username);}
            if(_email != ''){user.set("email", _email);}
            await user.save();
        }
        window.location.href = "dashboard.html";
    })
}
Transfer Functions
There are several functions we can use for transferring assets. Below, you can see the “Moralis.transfer(options)” function for sending ETH:
transferETH = async () => {
    let _amount = String(document.querySelector('#amountOfETH').value);
    let _address = document.querySelector('#addressToReceive').value;

    const options = {type: "native", amount: Moralis.Units.ETH(_amount), receiver: _address}
    let result = await Moralis.transfer(options)
    alert(`transferring ${_amount} ETH to your requested address. Please allow some time to process your transaction.`);
}
This function takes an argument in the form of an object. Accordingly, we need to specify the properties of the “options” object before calling this function. In the example above, we determine the token type to be “native”. Also, we determine how many user inputs we’re going to use and the address we want to send our ETH to. Generally speaking, transferring ERC-20 tokens is more complicated and time-consuming than sending ETH alone. However, we can achieve this with just a single line of code. We can see how this feature should appear below:
transferERC20 = async () => {
    let _amount = String(document.querySelector('#ERC20TransferAmount').value);
    let _decimals = String(document.querySelector('#ERC20TransferDecimals').value);
    let _address = String(document.querySelector('#ERC20TransferAddress').value);
    let _contract = String(document.querySelector('#ERC20TransferContract').value);

    const options = {type: "erc20",
                    amount: Moralis.Units.Token(_amount, _decimals),
                    receiver: _address,
                    contract_address: _contract}
    let result = await Moralis.transfer(options)
    console.log(result);
}
Furthermore, this function creates variables with the data fetched from the user’s input. Then, we use the same data to create an object using the variables and properties. The type is set to “erc20”, with user inputs implementing the amount and decimals. From here, the code will add the contract address and the receiver before we pass the “options” object as an argument, as we call the transfer function.
Moreover, the “getTransferERC20Balances()” function checks user balances to see which tokens are in their MetaMask wallets. Once we obtain these balances, the function creates a content block that is sent with information from the blockchain to the frontend of our dApp as the information that users can see below the input fields. The specified token’s decimals and address will automatically appear in these fields when a user clicks on any of these buttons. That’s it for our first out of three easy dApp ideas! Make sure to check out the Moralis GitHub repository for the complete code! Also, see the video below for a step-by-step guide of the entire process:
Easy dApp Ideas – How to Create Mobile Web3 dApps
Many dApps and Web3 applications lack a mobile-first approach. This often leads to a poor user experience when features are not transferable from browser-based dApps to mobile applications. With React Native support, Moralis makes it simple to create a mobile Ethereum dApp. Using Moralis’ React Native template, we’re going to create a simple mobile Ethereum dApp.
React Native is an open-source, declarative JavaScript (JS) user interface (UI) library that uses the “JSX” templating language for compiling code in the form of plain JavaScript functions. If you’re familiar with React, React Native is quite similar. However, rather than using web components as building blocks, React Native uses native components.
Furthermore, React Native is ideal for creating mobile applications for use on multiple platforms. If you’re unfamiliar with React, see the “what is React?” article to learn more. Moralis’ React Native template is a fantastic starting point for creating your own mobile Ethereum dApp. However, we also encourage you to play around and implement your own dApp-specific features!
React-Moralis Quick Start
So, let’s create a mobile Ethereum dApp using React-Moralis. To start, ensure you have installed “react”, “react-dom”, and “moralis” dependencies inside your code editor. Also, for this example, we’re using Visual Studio Code (VSC). Next, install the “react-moralis” dependency. We do this by entering the code below into our VSC terminal:
If you use npm package manager:  npm install react react-dom moralis react-moralis
If you use yarn package manager:  yarn add react react-dom moralis react-moralis
After this, we wrap our dApp in a “<MoralisProvider>” element and provide “appId” and “serverUrl”.
import React from "react";
import ReactDOM from "react-dom";
import { MoralisProvider } from "react-moralis";

ReactDOM.render(
  <MoralisProvider appId="xxxxxxxx" serverUrl="xxxxxxxx">
    <App />
  </MoralisProvider>,
  document.getElementById("root"),
);
Now, you simply call the hooks inside your dApp:
import React from "react";
import { useMoralis } from "react-moralis";

function App() {
  const { authenticate, isAuthenticated, user } = useMoralis();

  if (!isAuthenticated) {
    return (
      <div>
        <button onClick={() => authenticate()}>Authenticate</button>
      </div>
    );
  }

  return (
    <div>
      <h1>Welcome {user.get("username")}</h1>
    </div>
  );
}
Create a Moralis Server
You’ll need to create a Moralis account to get the application ID and server URL from your Moralis server. Once you’re logged in, simply click on the “+ Create a new Server” button at the top right of the window and select your network. We also recommend using the “Testnet Server” option when starting a new project. Then, enter the server name, region, and network. Remember, you can select multiple networks thanks to Moralis’ cross-chain support. Once you have completed these steps, click on “Add Instance”.
Next, click on the “View Details” button to retrieve the URL and application ID from your Moralis server. You should now see a pop-up window that contains all of the information you need to initialize Moralis and access the necessary backend functionality. Once Moralis is initialized, it’s time to start building! For this dApp ideas demo, we’ll be using WalletConnect. Below, you can see what our demo app is going to look like:

The image above illustrates how we tap the “Authenticate With Crypto Wallet” button after initiating our demo mobile dApp. By doing this, we also activate the WalletConnect authentication option. In this example, we’re using the MetaMask wallet app. Next, click on “Connect” and then “Sign” inside the MetaMask wallet application. Now we can see that our dApp is logged in, and there are several details available such as user address, user email, and native balance.
Code Walkthrough
That’s how simple it is to fetch on-chain data! Now it’s time to take a look at the code we’ll need to build our mobile Ethereum dApp. Furthermore, we’re going to be using multiple TypeScript (.tsx) files that contain all the code for this demo app. You can find all of these files at the Moralis GitHub repository (React Native boilerplate) to use throughout the development of your mobile dApp ideas.
In the “Providers.tsx” file, there are some important parts of code that we’ll take a closer look at. For example, after initializing Moralis using the application ID and server URL, our code should look something like this:
const appId = "INSERT_APP_ID"; // Application ID from moralis.io
const serverUrl = "INSERT_SERVER_URL"; // Server URL from moralis.io
const environment = "native";
const getMoralis = () => Moralis;
// Initialize Moralis with AsyncStorage to support react-native storage
Moralis.setAsyncStorage(AsyncStorage);
// Replace the enable function to use the react-native WalletConnect
// @ts-ignore
Moralis.setEnableWeb3(enableViaWalletConnect);
Now we have complete access to the Moralis API, including the advanced NFT API, Ethereum API, and various useful shortcuts. Below, we take a look at another vital element of our code for initializing Moralis and WalletConnect:
export const Providers = ({ children }: ProvidersProps) => {
return (
<WalletConnectProvider {...walletConnectOptions}>
<MoralisProvider appId={appId} serverUrl={serverUrl} environment={environment} getMoralis={getMoralis}>
{children}
</MoralisProvider>
</WalletConnectProvider>
);
};
The “App.tsx” File
We get the code for our app’s functionality and UI components from the “App.tsx” file. The complete code is available on GitHub, but for now, we’re going to focus on the code for the “hook calls”:
import React, { useEffect } from "react";
import { StyleSheet, Text, TouchableOpacity, View } from "react-native";
import { useMoralis, useMoralisWeb3Api, useMoralisWeb3ApiCall } from "react-moralis";
import { useWalletConnect } from "./WalletConnect";
Also, this file contains the code for making sure that we use WalletConnect for authenticating users and that user details are displayed correctly. Below, we have part of the code for the token balances‘ function:
Moralis.Web3API.account.getTokenBalances({ address: "" }).then(console.log);
}, []);
Furthermore, we have the function that lets us display users’ details and takes care of authentication:
function App(): JSX.Element {
const connector = useWalletConnect();
const { authenticate, authError, isAuthenticating, isAuthenticated, logout, Moralis } = useMoralis();
return (
<View style={[StyleSheet.absoluteFill, styles.center, styles.white]}>
<View style={styles.marginLarge}>
{authError && (
<>
<Text>Authentication error:</Text>
<Text style={styles.margin}>{authError.message}</Text>
</>
)}
{isAuthenticating && <Text style={styles.margin}>Authenticating...</Text>}
{!isAuthenticated && (
// @ts-ignore
<TouchableOpacity onPress={() => authenticate({ connector })}>
<Text>Authenticate</Text>
</TouchableOpacity>
)}
{isAuthenticated && (
<TouchableOpacity onPress={() => logout()}>
<Text>Logout</Text>
</TouchableOpacity>
)}
</View>
{isAuthenticated && (
<View>
<UserExample />
<Web3ApiExample />
</View>
)}
</View>
);
}
Easy dApp Ideas – Create a Mobile Ethereum dApp
Making a mobile Ethereum dApp with the Moralis React Native template removes much of the time-consuming, labor-intensive work from the development process, so you can spend more time on creating a fantastic user experience. We recommend checking out the Ethereum React Native boilerplate video below if you want to watch a step-by-step guide regarding this process. Also, you can learn how to implement email authentication and user login features to ensure that your users get the best possible experience! Plus, if you manage a team of blockchain developers, we recommend checking out the Blockchain Business Masterclass course at Moralis Academy!
dApp Ideas – How to Create a Web3 Social Media Platform
Creating an Ethereum social media platform wouldn’t usually be considered one of the easier dApp ideas. However, we’ve created a demo app similar to Reddit to show you how much time you can save with Moralis. Furthermore, for our social media platform, we’ll be using the ultimate Ethereum dApp boilerplate. Below, you can see what our app is going to look like, to begin with:

Decentradit
You can see that we’ve called our social media network “Decentradit” up at the top-left corner. Also, at the top-right corner, we can see the wallet address, indicating that a user is logged in. However, if nobody has logged in yet, you’d see the “Authenticate” button in the top-right corner instead. Furthermore, the “Authenticate” button uses MetaMask as authentication.
Decentradit uses a reputation scoring mechanism and categories section for different posts. Plus, each users’ wallet is displayed at the top of every post they create, along with the title. Also, other users can up-vote or down-vote posts, which is reflected by a customizable reputation score. The image below shows an example of a new post being published in the “Web3” category of our social media platform.
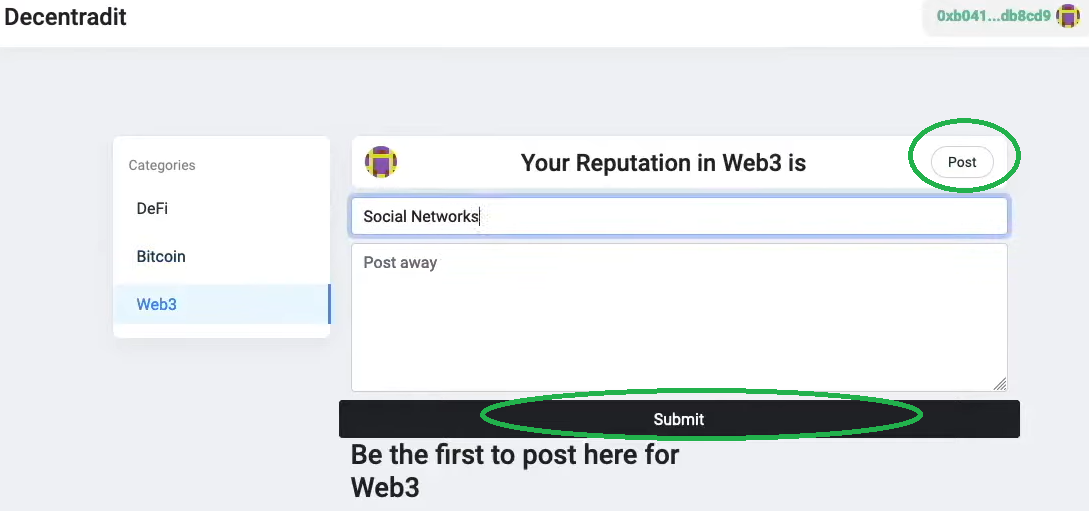
To do this, we simply select the “Web3” category before clicking the “Post” button. Then, we’re going to insert the title and the content. Once we’ve done this, we trigger MetaMask by clicking the “Submit” button. We’re also going to treat the “Submit” action as an on-chain transaction using MetaMask for verification:

Once the transaction is confirmed in MetaMask, our post goes live. In the image below, we can see how other users can vote on posts using the “Vote Up” button when we log in with another address:

Again, we’ll need to confirm this transaction using the automatic MetaMask prompt. After voting, you may notice that the “Vote Up” button turns grey to indicate that we’ve voted. Furthermore, when we log back into our original account, we also gain a reputation score of “1”:

Boilerplate Setup
Now it’s time to set up our Ethereum dApp boilerplate. To begin, visit “https://github.com/ethereum-boilerplate/ethereum-boilerplate“. Then, we also want to make a fork or clone of the “ethereum-boilerplate” depository using “git clone https://github.com/ethereum-boilerplate/ethereum-boilerplate.git”. You can use the copy button as seen in the image below:

Now that we’ve copied the address, we need to paste it into the terminal of our code editor:

After this, we’re going to install the dependencies using the terminal of our code editor. First, we’ll install “cd ethereum-boilerplate”. Then, we’ll also install “yarn install”:

Following this, we also add the Ethereum boilerplate folder to our code editor:

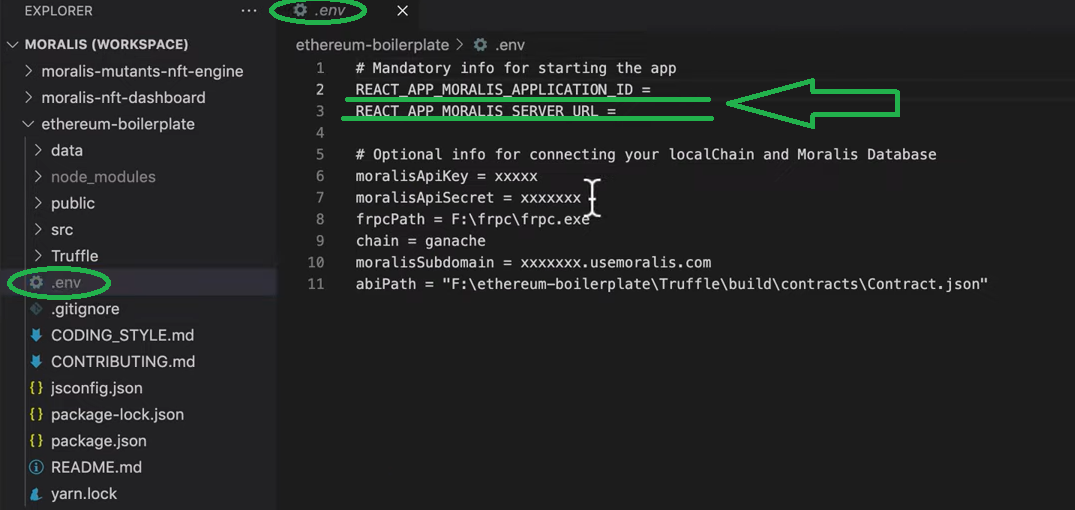
Now that the Ethereum boilerplate folder is added, we also want to change the name of the “.env.example” file to “.env”:

Additionally, you’ll need to provide the “appId” and “serverUrl” for your Moralis server to access the backend functionality using the file we just renamed (“.env”):
Moralis Server Details
To get the backend functionality, we’ll need to set up a free Moralis account. However, if you already have a Moralis account, simply navigate to the “Servers” tab within the Moralis admin panel and click the “+ Create a new Server” button. Then, we also need to select the server to suit the needs of your dApp from the drop-down menu. The “Testnet Server” is often a good choice when creating example projects.
After this, we also need to add our server name, region, network, and chain(s) in the following pop-up window. To finish this step, simply click “Add Instance”. Your server should take just a few minutes to start, so sit tight! Then, once your Moralis server is up and running, click the “View Details” button next to the name of your server:
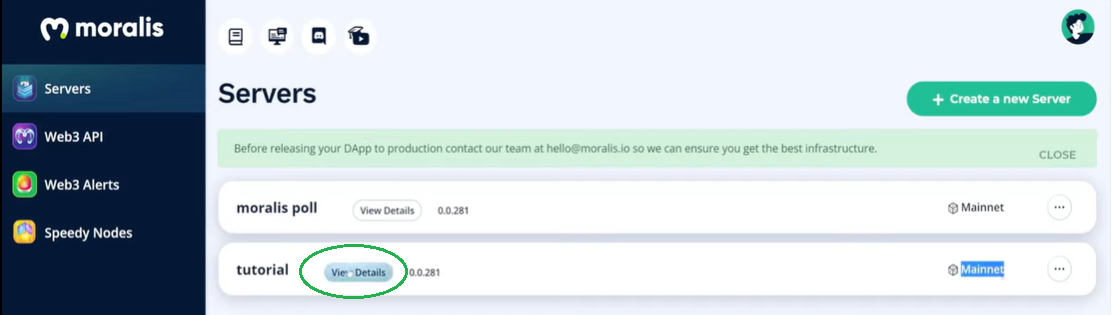
Your server details will appear in a pop-up window. Next, click the copy icon beside the server URL and application ID. After this, you’ll also need to populate your “.env” file with the details of your Moralis server to access the necessary backend functionality for your dApp.
Programming
Now that we’ve successfully set up our Moralis server, let’s get down to business! You can find the complete code for this demo app on GitHub. Also, see the video below for a step-by-step guide with an experienced Moralis developer:
Coding Web3 Social Network (Reddit Clone) – Full Course Based on the Ethereum Boilerplate
The “decentradit.sol” smart contract is one of the key parts of voting and posting on our social network. You can find an in-depth walkthrough of smart contracts by jumping forward to 3:13 in the video above. Furthermore, you can also find out how to set up event listeners for your server at 14:08 in the same video. Plus, we discuss the Ethereum dApp boilerplate setup between 21:58 – 24:50. After this, we explain the adjustments we need to make and which files to use to create our Ethereum social network. Moreover, make sure to connect the dApp to the “decentradit.sol” smart contract. You can also find a breakdown of this at 1:04:25 in the video above. Furthermore, we can take advantage of Moralis’ InterPlanetary File System (IPFS) integration to provide decentralized storage for our content and posts.
Creating an exciting social network on Ethereum is by no means a simple task. However, because we’re using Moralis, we can save hours of cumbersome development time by using single snippets of code to cover a lot of the backend development. Moreover, creating a high-quality social media network on Ethereum requires some advanced JavaScript skills. Therefore, we strongly recommend enrolling in the JavaScript Programming for Blockchain Developers course at Moralis Academy if you want to brush up on your coding skills!
dApp Ideas – 3 Easy dApp Ideas to Build Today – Summary
Now that you’ve got some inspirational dApp ideas, it’s time to get building! Whatever your goals are in blockchain development, Moralis Academy provides the best-in-class blockchain and Web3 education. Furthermore, Moralis is helping developers to reduce development time by 87% on average.
Also, tools such as the Moralis Web3 SDK and the Moralis Web3 API are changing the game for developers by providing the highest quality tools and templates. Therefore, developing with Moralis allows you to concentrate on building phenomenal dApps while we take care of backend functionality!
Moreover, if you want to familiarize yourself with advanced Ethereum tooling such as Truffle Suite to build, test, and deploy smart contracts, make sure to check out the Ethereum Smart Contract Programming 201 course at Moralis Academy! Also, don’t forget to reach out to us on Twitter @MoralisAcademy! We’d love to hear about the dApp ideas you’re building!


