
In recent months, a wave of next-gen decentralized applications (dApps) has elevated the blockchain industry to new heights. Moreover, the rise of non-fungible tokens (NFTs), decentralized finance (DeFi), and blockchain gaming have paved the way for a diverse range of blockchain-based applications for various use cases. However, being an aspiring blockchain developer who wants to create various dApps, and with so many different types of dApps already available, it can be challenging to know where to start. Therefore, we’ll provide some excellent DeFi ideas herein. As such, you’ll be able to take your own decentralized finance app into production and deploy it in no time.
In this article, we’re going to explore three excellent DeFi ideas that will help you build and deploy great products markedly quicker! Plus, we’ll discuss some of the most common tools used by top developers to speed up the entire process without compromise. So, if you have your own DeFi ideas that you want to bring to life, read on!
Moreover, if you’re pursuing a career as a smart contracts developer, make sure to check out our Ethereum dApp Programming course! In this course, students learn how to use common Ethereum tools such as Web3.js, MetaMask, and Truffle Suite. Plus, we show students how to build a fully-functional CryptoKitties NFT marketplace! Join our community of over 30,000 students today at Moralis Academy!
DeFi Ideas – Create a DEX
The first DeFi idea is to create a decentralized exchange (DEX) similar to Uniswap or 1inch. We’ll begin by setting up a Moralis server. After this, we’re also going to install the 1inch DEX plugin before creating an HTML and JavaScript file. Then, we’ll assign functions to each event. Additionally, we might want to style the application using CSS, but we’ll stick to HTML and JavaScript elements for the purpose of this article. However, you can find a complete video walkthrough, including how to style fields and buttons with CSS in the video further down in this article. Also, feel free to check out the entire code for our demo dApp at our GitHub repository.
To initialize the process, start by logging in to your Moralis account. Next, click the “+ Create a new Server” button at the top of the Moralis admin panel. Next, from the drop-down menu, we’re going to select the “Mainnet Server” option for “ETH” and click “Add Instance” to spin up the server. This should only take a few minutes.
Now that our server is up and running, we also need to install the Moralis 1inch DEX plugin. To do so, start by heading over to Moralis’ plugin store via the “Plugins” button on our server, followed by “Go to Plugin Store”. Then, click on “Read More”, “Install” and select the server that we just set up.
We now want to set up an HTML file, which we’re going to name “index.html”. You can find the complete code for this file by clicking on the file name. Moreover, the file is split into four sections; however, before we move on, let’s take a look at these sections in more detail.
DeFi Ideas – Essential Imports
To begin, we need to implement some essential imports into our code. These imports include “web3.js” and “moralis.js”, which are essential to the smooth running of our dApp. Furthermore, to implement these essential imports, we simply need to grab some boilerplate code from the Moralis GitHub page.

Below, you can see what our final code looks like after copying and pasting the code and also making some minor adjustments such as the title and removing any mention of “Jumbotron” from our code.
<!DOCTYPE html>
<html>
  <head>
    <meta charset="utf-8">
    <meta name="viewport" content="width=device-width, initial-scale=1, shrink-to-fit=no">

    <title>My DEX</title>
    <script src="https://cdn.jsdelivr.net/npm/web3@latest/dist/web3.min.js"></script>
    <script src="https://code.jquery.com/jquery-3.6.0.min.js" integrity="sha256-/xUj+3OJU5yExlq6GSYGSHk7tPXikynS7ogEvDej/m4=" crossorigin="anonymous"></script>
    <script src="https://unpkg.com/moralis/dist/moralis.js"></script>
    <script src="https://stackpath.bootstrapcdn.com/bootstrap/4.4.1/js/bootstrap.min.js" integrity="sha384-wfSDF2E50Y2D1uUdj0O3uMBJnjuUD4Ih7YwaYd1iqfktj0Uod8GCExl3Og8ifwB6" crossorigin="anonymous"></script>
    <link rel="stylesheet" href="https://stackpath.bootstrapcdn.com/bootstrap/4.4.1/css/bootstrap.min.css" integrity="sha384-Vkoo8x4CGsO3+Hhxv8T/Q5PaXtkKtu6ug5TOeNV6gBiFeWPGFN9MuhOf23Q9Ifjh" crossorigin="anonymous">
    <link rel="stylesheet" href="./style.css">
  </head>
  <body>
Navigation Bar
To add a navigation bar to our HTML code, we need to fetch a template from Bootstrap and then implement it into our code. We chose the first template from Bootstrap and made a few tweaks such as removing unwanted elements. In the code below, you can see what our final code looks like:
<body>
    <nav class="navbar navbar-expand-lg navbar-light bg-light">
        <a class="navbar-brand" href="#">My DEX</a>
        <button class="navbar-toggler" type="button" data-toggle="collapse" data-target="#navbarSupportedContent" aria-controls="navbarSupportedContent" aria-expanded="false" aria-label="Toggle navigation">
          <span class="navbar-toggler-icon"></span>
        </button>

        <div class="collapse navbar-collapse" id="navbarSupportedContent">
            <ul class="navbar-nav mr-auto">
                <li class="nav-item active">
                <a class="nav-link" href="#">Home <span class="sr-only">(current)</span></a>
                </li>
            </ul>
            <button id="login_button" class="btn btn-outline-primary my-2 my-sm-0" type="submit">Sign in with Metamask</button>
        </div>
      </nav>
Container Class
Now, we’re also going to add the “div” container. Furthermore, this will hold the DEX’s UI content and will include essential elements such as code for the buttons and fields. In the code below, you can see how our complete “div” container appears:
<div class="container">
        <div class="row">
            <div class="col col-md-6 offset-md-3" id="window">
                <h4>Swap</h4>
                <div id="form">
                    <div class="swapbox">
                        <div class="swapbox_select token_select" id="from_token_select">
                            <img class="token_image" id="from_token_img">
                            <span id="from_token_text"></span>
                        </div>
                        <div class="swapbox_select">
                            <input class="number form-control" placeholder="amount" id="from_amount">
                        </div>
                    </div>
                    <div class="swapbox">
                        <div class="swapbox_select token_select"  id="to_token_select">
                            <img class="token_image" id="to_token_img">
                            <span id="to_token_text"></span>
                        </div>
                        <div class="swapbox_select">
                            <input class="number form-control" placeholder="amount" id="to_amount">
                        </div>
                    </div>
                    <div>Estimated Gas: <span id="gas_estimate"></span></div>
                    <button disabled class="btn btn-large btn-primary btn-block" id="swap_button">
                        Swap
                    </button>
                </div>
            </div>
        </div>
    </div>
Here, you can see that there are also several other “divs” within the complete “div” container, including two “swapbox” classes. Furthermore, the “swapbox” classes include HTML code for token selection and input fields. Additionally, one of the “divs” with the ”swapbox” class shows which token the user wishes to trade, and the other shows the token the user wants to receive.
Following these two elements, there is also a “div” used for presenting gas estimates. Plus, there is another “div” for the button the user will press to execute the trade. However, it’s worth bearing in mind that the HTML code should be adapted to meet the needs of the dApp you’re creating. Accordingly, your content might not be structured in the same way.
Modal
Each time a user interacts with your dApp and selects a token, a menu will appear that contains every available alternative. This means that we’re going to need an HTML element for displaying tokens, which is what the modal “div” is used for. To create this, we need to fetch another Bootstrap template and make a few tweaks. Below you can see how our complete modal “div” appears:
<div class="modal" id="token_modal" tabindex="-1" role="dialog">
<div class="modal-dialog" role="document">
<div class="modal-content">
<div class="modal-header">
<h5 class="modal-title">Select token</h5>
<button id="modal_close" type="button" class="close" data-dismiss="modal" aria-label="Close">
<span aria-hidden="true">×</span>
</button>
</div>
<div class="modal-body">
<div id="token_list"></div>
</div>
</div>
</div>
</div>
<script type="text/javascript" src="./main.js"></script>
</body>
</html> By looking at the code above, notice that part of the “div” is a button that will close the modal after being opened. Moreover, this button uses the “modal_close” ID, which we will tie to a function to close the modal. Also, within the body of the modal is a “div” for displaying a token list to users of the DEX, which we’ll discuss shortly, along with the functions of the dApp.
We’re now going to move on to the HTML code. However, if you’re using the same code from our GitHub repository, it will most likely look a bit messy. This is because the application is yet to be styled. Therefore, to do this, we will use CSS. Moreover, you can customize this to suit the specific needs of your dApp. Furthermore, if you want some inspiration, make sure to check out our “style.css” file.
DeFi Ideas – Creating a JavaScript File
After building the fields and buttons for our dApp, it’s time to add some functions and logic. However, before we do this, we need to initialize Moralis by fetching the server URL and application ID from the server we created in the previous step. To do this, simply click on the “View Details” button on the relevant server and then copy and paste the information into your code as shown below:
Moralis.initialize("VHVdtVWLxbMAIqyD6ycfbFAk9cV1yhVw7U2RkKM6"); // Application id from moralis.io

Moralis.serverURL = "https://edrq8aj6uilj.grandmoralis.com:2053/server"; //Server url from moralis.io
When Moralis is initialized, we’re going to add three global variables. The first represents the current trade, whereas the second is the “side” currently selected, and the third represents the tokens. We’ll discuss this in further detail shortly. However, in the code below, you can see how they appear:
let currentTrade = {};
let currentSelectSide;
let tokens;
The “init()” Function
As the global variables are in place, let’s move on to adding some functions to our dApp. We’re going to call our first function “init()”. Furthermore, this function will run immediately when the dApp launches and takes care of various initial tasks when a user logs in to the dApp. You can see the entire function in the code below:
async function init() {
  await Moralis.start({ serverUrl, appId });
  await Moralis.enableWeb3();
  await listAvailableTokens();
  currentUser = Moralis.User.current();
  if (currentUser) {
    document.getElementById("swap_button").disabled = false;
  }
}
Moreover, it’s worth paying attention to the first two lines in the code above. The first ensures that plugins from the server are readily available, while the second initializes the Moralis SDK. Also, the third line runs the “listAvailableTokes()” function to fetch token data and load it into the dApp upon launch.

Furthermore, we do this for efficiency, as it means that users won’t have to wait for the dApp to fetch the alternatives just before a trade is carried out. Following this, we’re also going to see if the user is authenticated and has logged in using MetaMask. If they are, we enable the “Swap” button.
The “login()” Function
Our second function is the “login()” function. This is a fairly simple function which should look something like this:
async function login() {
  try {
    currentUser = Moralis.User.current();
    if (!currentUser) {
      currentUser = await Moralis.authenticate();
    }
    document.getElementById("swap_button").disabled = false;
  } catch (error) {
    console.log(error);
  }
}
This function checks to see if a user is logged in, but if they’re not, we can authenticate users via MetaMask. However, if they are, this function merely enables the “Swap” button.
The “openModal()” and “closeModal()” Functions
These two functions pretty much speak for themselves. The first opens the modal and the second closes it. Moreover, the code below shows that the “openModal()” function takes an argument as a “side”:
function openModal(side) {
  currentSelectSide = side;
  document.getElementById("token_modal").style.display = "block";
}
function closeModal() {
  document.getElementById("token_modal").style.display = "none";
}
The variable will change depending on if the user selects the “from_token_select” option or the “to_token_select” option. Furthermore, once we establish this information, the function will change the state of the “currentSelectSide” global variable, indicating to the dApp where any future changes should occur.
The “listAvailableTokens()” Function
The “listAvailableTokes()” function is one that we call through the “init()” function. Moreover, it does several things. As can be seen in the code below, this function acquires the available tokens via the Moralis “getSupportedTokens()” function, which are then stored in a list:
async function listAvailableTokens(){
    const result = await Moralis.Plugins.oneInch.getSupportedTokens({
        chain: 'eth', // The blockchain you want to use (eth/bsc/polygon)
      });
    tokens = result.tokens;
    let parent = document.getElementById("token_list");
    for( const address in tokens){
        let token = tokens[address];
        let div = document.createElement("div");
        div.setAttribute("data-address", address)
        div.className = "token_row";
        let html = `
        <img class="token_list_img" src="${token.logoURI}">
        <span class="token_list_text">${token.symbol}</span>
        `
        div.innerHTML = html;
        div.onclick = (() => {selectToken(address)});
        parent.appendChild(div);
    }
}
This information enables us to access things such as the decimals of tokens and token symbols. After this, we go through every object with a “for” loop. Then, we take this information and use it to populate a list. Furthermore, this list will allow us to show the relevant images and token symbols to users of the application via the modal from the HTML code we discussed earlier. Moreover, we also include an “onclick” event to every token in the “for” loop so that the “selectToken()” function is triggered when a user selects any of the options in the list.
The “selectToken()” Function
Each time a user selects a token from the modal, a triggered “selectToken()” function will pass the relevant token address as an argument before the modal is closed with a “closeModal()” function. Also, the “selectToken()” function adds the token selection to the global “currentTrade” object when the user chooses which token to swap and the token they want to receive. Furthermore, the “selectToken()” function calls the “renderInterface()” and “getQuote()” functions to render token images and symbols, which can be seen in both the “from_token_select” and “to_token_select” elements as per the code below:
function renderInterface(){
    if(currentTrade.from){
        document.getElementById("from_token_img").src = currentTrade.from.logoURI;
        document.getElementById("from_token_text").innerHTML = currentTrade.from.symbol;
    }
    if(currentTrade.to){
        document.getElementById("to_token_img").src = currentTrade.to.logoURI;
        document.getElementById("to_token_text").innerHTML = currentTrade.to.symbol;
    }
}
The “getQuote()” Function
As the name suggests, the “getQuote()” function aims to retrieve quotes for token swaps and display the number of tokens a user receives when making a trade. Additionally, this function checks to see if a user has selected the tokens they want to trade and receive. Moreover, it also checks to see if there is a “from_amount” value.
The absence of either of these values would cause the function to return until all relevant data is inputted. However, if all of the information has been inputted, the inputted amount is then converted using a “value” variable according to the number of decimals of the chosen token. Furthermore, if the amount is correct, this function will also call the “quote()” function from the 1inch plugin. After this, we assign the relevant address and the “amount” variable we converted earlier. Moreover, now that we have the quote, the function will set the “to_amount” and the estimated gas price so users can see the amount they will receive from the trade and the gas estimate.
The “trySwap()” Function
The 1inch plugin must receive an allowance for its smart contracts to enable token sending. Accordingly, the “trySwap()” function calls the “doSwap()” function before checking to see if the dApp user has provided an allowance. Therefore, the “trySwap()” function must retrieve a user’s wallet addresses and convert the inputted amount.

Furthermore, trading ETH does not require an allowance. However, this function will check to see if the currency symbol is equal to “ETH”. Further, in the event that the currency symbol is not equal to “ETH”, we call the “hasAllowance()” function to see if an allowance has been provided by the user, resulting in the return of a boolean with a value of true or false. Moreover, if a user does not provide an allowance, calling the “approve()” function fetches an allowance from the user to enable the swap. You’ll also need to provide the token address and the user’s wallet address for this function, as seen in the code below:
async function trySwap(){
    let address = Moralis.User.current().get("ethAddress");
    let amount = Number(
        document.getElementById("from_amount").value * 10**currentTrade.from.decimals
    )
    if(currentTrade.from.symbol !== "ETH"){
        const allowance = await Moralis.Plugins.oneInch.hasAllowance({
            chain: 'eth', // The blockchain you want to use (eth/bsc/polygon)
            fromTokenAddress: currentTrade.from.address, // The token you want to swap
            fromAddress: address, // Your wallet address
            amount: amount,
        })
        console.log(allowance);
        if(!allowance){
            await Moralis.Plugins.oneInch.approve({
                chain: 'eth', // The blockchain you want to use (eth/bsc/polygon)
                tokenAddress: currentTrade.from.address, // The token you want to swap
                fromAddress: address, // Your wallet address
              });
        }
    }
    try {
        let receipt = await doSwap(address, amount);
        alert("Swap Complete");

    } catch (error) {
        console.log(error);
    }

}
The “doSwap()” Function
Our final function is the “doSwap()” function, which we use to execute the transfer immediately after the user provides an allowance. Therefore, we call the 1inch Moralis “swap()” function with some parameters:
function doSwap(userAddress, amount){
    return Moralis.Plugins.oneInch.swap({
        chain: 'eth', // The blockchain you want to use (eth/bsc/polygon)
        fromTokenAddress: currentTrade.from.address, // The token you want to swap
        toTokenAddress: currentTrade.to.address, // The token you want to receive
        amount: amount,
        fromAddress: userAddress, // Your wallet address
        slippage: 1,
      });
}
When the “doSwap()” function is called, the amount and user address are each passed as an argument while the remaining information is fetched from the tokens the user selects. Also, the image above shows that slippage appears as a new property and is set to 1%, as the standard is with many DEXs. Furthermore, we use the “trySwap()” function to alert users that the trade has been successful.
DeFi Ideas – Assigning Functions to Each Event
So, we now have our buttons and fields working properly with their complete functions. To finish building our DEX, we’re going to make the various components speak to each other by adding some “onclick” events and an “onblur” event to our buttons and fields. To do this, we assign a function to each event. Below, you can see how the final lines of our JavaScript file appear:
init();

document.getElementById("modal_close").onclick = closeModal;
document.getElementById("from_token_select").onclick = (() => {openModal("from")});
document.getElementById("to_token_select").onclick = (() => {openModal("to")});
document.getElementById("login_button").onclick = login;
document.getElementById("from_amount").onblur = getQuote;
document.getElementById("swap_button").onclick = trySwap;
The “onclick” events make a function execute when a user clicks a button. However, the “onblur” event is slightly more complicated. Also, this event makes the “getQuote()” function trigger when a user shifts focus away from the “from_amount” field. Furthermore, this enables the quote to be automatically displayed in the “to_amount” field after typing in the amount.
Now that we’ve gone over the basic elements of building your own DEX, it’s time to get creative and style your dApp using CSS! Also, because we’re using Moralis, much of the leg work is taken care of, so you can focus on creating a beautiful product. Moreover, make sure to check out our GitHub repository for the complete code and our “style.css” file! Plus, you can find a step-by-step video guide below:
DeFi Ideas – Build a DeFi Dashboard
Do you want to build a cross-chain DeFi dashboard? No problem! To create a DeFi dashboard, begin by creating a Moralis server as we did in the previous example. Then, connect your dApp to the Moralis server and use one of our HTML templates to create the structure for your dApp quickly. Also, you can use one of our templates to create a JavaScript file to provide your dApp with logic. Following this, we’re going to use Moralis authentication for importing on-chain data to the Moralis dashboard. Then, we’ll query the Moralis dashboard to access our on-chain data. Furthermore, you can also put your JavaScript skills to the test by designing an attractive user interface (UI)!
Server Instance
Once you have created your server and entered the required details, click on the “Select All Chains” option and select “Add Instance”. Then, click on the “View Details” button next to the name of your server. Moreover, a pop-up window will present you with server information you need to copy, as seen in the image below:
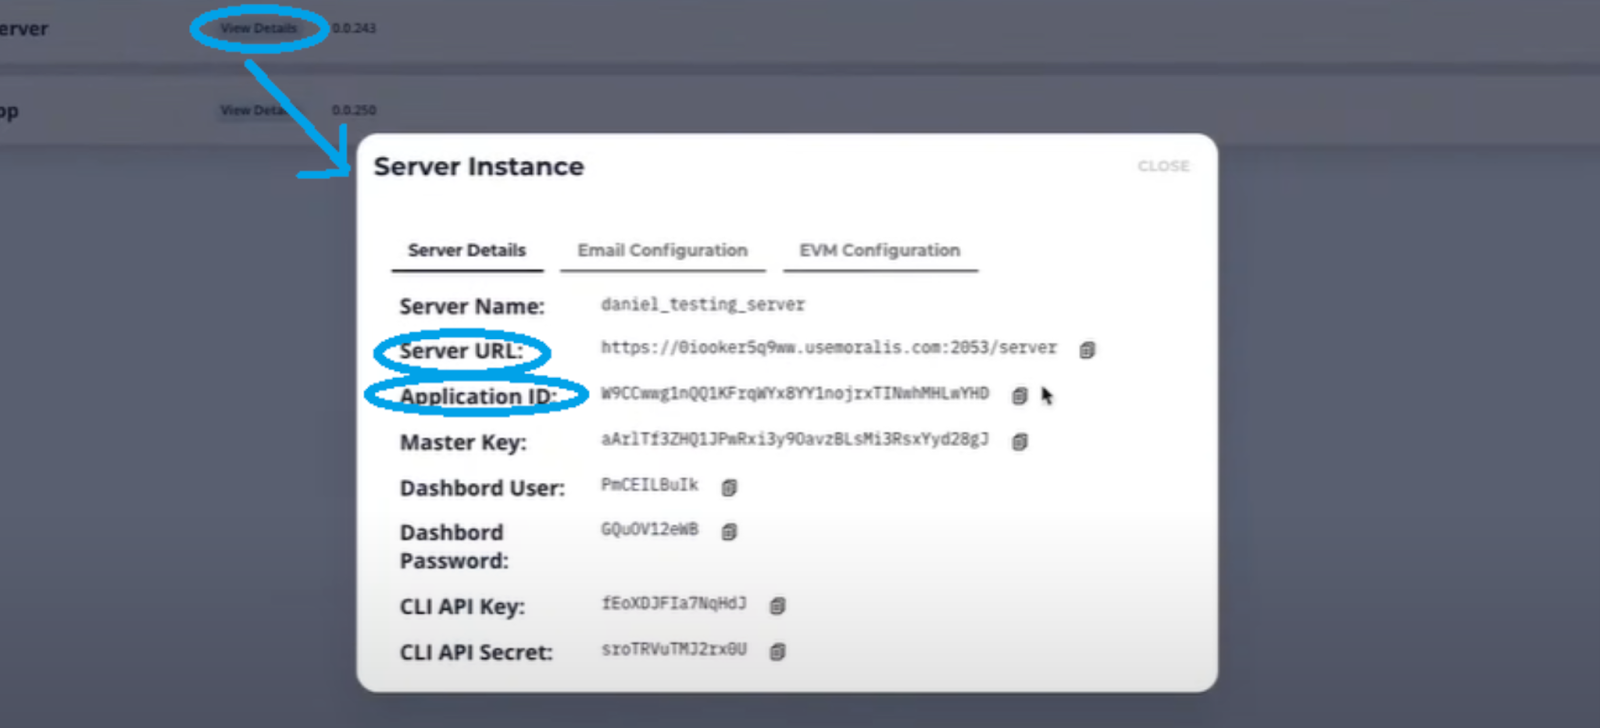
After this, initialize Moralis by populating your “.js” or “.html” file with the application ID and server URL to fetch the necessary backend functionality. Now that the Moralis server is prepared, we’re going to build our dApp. To do this, we’ll create an HTML and JavaScript file. The “index.html” file will provide the structure of our DeFi dashboard. Furthermore, the “logic.js” file will also provide the logic to make our dashboard function correctly.
Most of the code in these files relates to the frontend, so we’re going to look at the code that covers blockchain-related functionality. However, you can find the complete code at our GitHub, which you can use as a template.
Add “<script src=”https://unpkg.com/moralis/dist/moralis.js”></script>” to the “index.html” file to add the Moralis packages inside the “<head> </head>” elements. Then, add your server details in both files. Also, the majority of the HTML and JavaScript code serves to maintain the structure of our DeFi dashboard. However, there are several important backend functionalities to our dApp. Moreover, one of the most important backend functions is authentication.
Authenticating Users
Moralis provides built-in MetaMask authentication for simple login functionality. Also, we’ve written the code in such a way that users balances are displayed automatically upon login. Furthermore, the lines of code below are from the “index.html” file and they cover the authentication functionality:
async function login() {
let user = Moralis.User.current();
if (!user) {
user = await Moralis.Web3.authenticate()
.then(function (user) {
console.log("logged in user:", user.get("ethAddress"));
document.getElementById("num").innerHTML = user.get("ethAddress")
})
}
document.getElementById("btn-logout").style = "display:inline";
document.getElementById("btn-refresh").style = "display:inline";
document.getElementById("btn-login").style = "display:none";
await displayTokens("eth", "ETH", "0xc02aaa39b223fe8d0a0e5c4f27ead9083c756cc2", 18,"EthTokenBalance", "EthBalance", "ethTab");
await displayNFTS("eth", "EthNFTOwners");
await displayTokens("polygon", "MATIC", "0x0d500b1d8e8ef31e21c99d1db9a6444d3adf1270", 18,"PolygonTokenBalance", "PolygonBalance", "polygonTab");
await displayNFTS("polygon", "PolygonNFTOwners");
await displayTokens("bsc", "BNB", "0xbb4CdB9CBd36B01bD1cBaEBF2De08d9173bc095c", 18,"BscTokenBalance", "BscBalance", "bscTab");
await displayNFTS("bsc", "BscNFTOwners");
await displayTokens("avalanche", "AVAX", "0xB31f66AA3C1e785363F0875A1B74E27b85FD66c7", 18,"AvaxTokenBalance", "AvaxBalance", "avaxTab");
}
async function logOut() {
await Moralis.User.logOut();
location.reload();
}
document.getElementById("btn-login").onclick = login;
document.getElementById("btn-refresh").onclick = login;
document.getElementById("btn-logout").onclick = logOut;
DeFi Ideas – Moralis Dashboard
Click the three dots on the icon of your chosen server and then click “Dashboard” to enter your Moralis dashboard. If nobody has logged in to your dApp yet, the dashboard will not contain a lot of information. However, the dashboard will be populated with details for all supported chains as soon as the first user logs in. This allows us to access all available on-chain data for all four chains, including NFT balances and transactions on Avalanche, Binance Smart Chain (BSC), Ethereum, and Polygon. Also, there are several useful queries inside the code of the “logic.js” file. Below, you can see part of the “displayTokens” function:
async function displayTokens(chn, chnSymbol, nativeAdd, nativeDecimals,dbRef, dbRefNative, htmlRef){
const query = new Moralis.Query(dbRef)
query.equalTo("address", Moralis.User.current().get("ethAddress"))
query.notEqualTo("balance", "0");
const results = await query.find();
const queryNative = new Moralis.Query(dbRefNative)
queryNative.equalTo("address", Moralis.User.current().get("ethAddress"))
const resultsNative = await queryNative.first();
let nativePrice = {};
let prices = [];
if(chn != "avalanche"){
nativePrice = await Moralis.Web3API.token.getTokenPrice({chain:chn, address: nativeAdd})
prices = await Promise.all(results.map(async (e) =>
await Moralis.Web3API.token.getTokenPrice({chain:chn, address: e.get("token_address")})
));}else{
nativePrice = {usdPrice: 1};//set avax price
prices = [{usdPrice: 1}]; //set avalanche chain token prices
}
Furthermore, we have the code for the “displayNFTS” function:
async function displayNFTS(chn, dbRef){
const query = new Moralis.Query(dbRef)
query.equalTo("owner_of", Moralis.User.current().get("ethAddress"))
const results = await query.find();
let images = await Promise.all(results.map(async (e) =>
await Moralis.Web3API.token.getTokenIdMetadata({ address: e.get("token_address"), token_id: e.get("token_id"), chain: chn })
));
if(chn == "bsc")
images.forEach((e,i) =>{
document.getElementById(i+chn).src = JSON.parse(e.metadata).nft.image;
});else{
images.forEach((e,i) =>{
document.getElementById(i+chn).src = JSON.parse(e.metadata).image;
});
}
}
Moralis API
You may notice the Moralis Ethereum API and NFT API in the code above. By simply adding “Moralis.Web3API.token.getTokenPrice” and “Moralis.Web3API.token.getTokenIdMetadata”, token and NFT balances can be retrieved with ease. Furthermore, the Moralis Web3 API is universal across all supported blockchains. So, why not go to town and introduce some advanced functionality now that you’ve built your DeFi dashboard? Put your design skills to work and get creative!
Moralis Academy is the ultimate place to learn how to build and deploy your own decentralized applications (dApps). Regardless of experience, we offer easy-to-follow, video-guided tutorials to help you become blockchain certified. Also, if you have no coding experience, make sure to check out our JavaScript Programming for Blockchain Developers course. Here, you can learn the basics before moving on to our more advanced courses. Start your dApp development journey today with Moralis Academy!
DeFi Ideas – How to Build a Fiat Gateway
Offering a solution for users to buy and sell cryptocurrencies directly from your dApp can help to create a superior user experience, giving you the edge in a highly-competitive dApp market. However, building a fiat onramp from scratch can also be time-consuming and resource-intensive without the appropriate tools.

Therefore, we’re going to show you how quick and straightforward it is to add a fiat gateway to your dApp using the Moralis fiat onramp plugin. In just three simple steps, you can avoid all of the complex backend development and save time to focus on creating an amazing user experience. Also, with just a single line of code, you can create a sleek fiat gateway using an expert-developed infrastructure. First, we’ll create a Moralis server. Second, we’ll install the Moralis fiat onramp plugin. Then, we’ll dive into the process of adding a fiat gateway to your dApp!
DeFi Ideas – Create a Moralis Server
To begin, you’ll need to sign up for a free Moralis account. Then, once you’ve created an account, click on the “+ Create a new Server” button. Moreover, a drop-down menu will prompt you to select one of three options. You can select either “Mainnet Server”, “Testnet Server”, or “Local Devchain Server”. However, in this example, we’re going to select “Testnet Server”.
Once you have selected your server, a new window will appear. You’ll also need to select a server name, region, and the network you want to use. Furthermore, Moralis supports cross-chain compatibility. As such, you also have the option of selecting multiple networks. After selecting your preferences, click on the “Add Instance” button to get the ball rolling. This could take a few minutes, so sit tight!
Install the Moralis Plugin
So, once your server is up and running, it’s time to add the Moralis fiat onramp plugin. Begin by clicking on the three small dots on the icon of your chosen server. Then, click on the “Plugins” button. You will see a pop-up window appear, informing you that there are currently no custom plugins installed.
From here, we want to navigate to the Moralis plugin store to find the fiat onramp plugin. Furthermore, once you’ve found the fiat onramp plugin, simply click “Read More”, followed by “Install the plugin”. Then, select the relevant server for where you want to install the plugin.
Furthermore, after selecting the server, click “Confirm”. At this stage, you’re almost there! All you need to do now is fetch an API (application programming interface) from Onramper’s official website by signing up and getting your own API key. Then, once you have your API key, you can complete the final stages of the process and add the fiat onramp plugin to your server. This will take just a few minutes to install. Moreover, once this has finished, it’s time to create the dApp itself!
Create the dApp
For this simple dApp, we’re going to start with a button. The button we’re creating here uses an “onclick” event to trigger a “buycrypto()” function (we’ll discuss this shortly). Moreover, take a look at the HTML code below:
<button id=''btn-login'' onclick='buycrypto()''>Buy crypto</button>This is what the code for your new button will look like. Once you have added the button, we also need to initialize Moralis and connect our code to the Moralis server we created in the first step. To do this, we add the following two lines into our code:
Moralis.initialize(''YOUR_APP_ID'');

Moralis.serverURL = 'https://YOUR_MORALIS_SERVER:1337/server'
At this point, the app ID and server URL still need to be fetched from the Moralis server. We do this by navigating back to the “Servers” tab in the admin panel and clicking “View Details” on the relevant server. Then, simply copy and paste the two elements that appear in your code.
Now that Moralis is initialized, we also need to run the “initPlugins()” command to let our code know which plugins are installed so that they’re accessible while we’re developing. To do this, we create a one-line function to instantly define and execute the command as shown in the code below:
(async function(){
     Moralis.initPlugins();
})();
To finish, we need to add some functionality to the “buycrypto()” function we mentioned earlier. Simply add the Moralis “Plugins.fiat.buy()” function inside the curly braces of our own function. Then, your code should look like this:
function buycrypto(){
     Moralis.Plugins.fiat.buy();
}
Now, all that’s left is to add the fiat gateway to our dApp, and your users will be able to purchase cryptocurrencies directly within your application. Also, see below for a step-by-step video guide!
Summary of DeFi Ideas – Ideas for Your Own Decentralized Finance App
With Moralis, you can bring your DeFi ideas to life with some of the best Web3 development tools available. Plus, with just a few lines of code and a little know-how, you can turn your DeFi ideas into next-generation Web3 apps quickly!
The Moralis SDK is the ultimate SDK for Web3 development. Furthermore, Moralis has been proven to cut the average development time by 87%. As such, Moralis enables you to launch your DeFi dApp ideas markedly quicker! Also, make sure to check out the Ethereum Smart Contract Programming 201 course at Moralis Academy if you want to learn how to build your own DEX from scratch! Moreover, this course teaches students about the latest smart contract standards. Plus, you’ll learn how to use Ethereum tools such as Truffle Suite and OpenZeppelin! Additionally, don’t forget to follow us on Twitter @MoralisAcademy and let us know about your DeFi ideas!


