
In this article, we’ll educate you on how to develop a cryptocurrency on Ethereum. Furthermore, we’re going to create an ERC-20 token that will be deployed on Ethereum’s Ropsten testnet. However, this process is transferable to the Ethereum mainnet with some straightforward adjustments. Also, many of these steps are the same for creating an ERC-20 token on Polygon, a BEP-20 token on Binance Smart Chain (BSC), or other ERC-20 derivatives such as those on Fantom, Avalanche, and Arbitrum.
Since we’ll be using the Web3 SDK and Web3 API from Moralis, we can create a cryptocurrency in ten minutes. We’ll also be using ETH Brownie, a Python-based framework that lends itself to testing and developing decentralized applications (dApps). Also, we’ll be using OpenZeppelin, an open-source collection of vetted smart contract templates for developing Web3 applications. The smart contracts we create in this example will be transposable into Remix.
In addition, we’ll be using MetaMask, the number one Web3 wallet, for authentication and checking wallet balances. Check out the DeFi 101 course at Moralis Academy to learn how to install and use MetaMask with some of the most prominent DeFi protocols! Also, save our “What is Web3?” and “What are dApps?” articles for later to learn more about the world of DeFi and Web3. Join our community of over 30,000 students today at Moralis Academy!
Testnets
In this example, we’ll be creating testnet tokens. As you might have guessed, testnets are blockchain networks that enable us to test our cryptocurrencies and smart contracts to ensure that they function correctly before deploying them on the mainnet. Furthermore, testnets mimic real-life on-chain activity in a reliable way.
As mentioned, we’re using the Ropsten testnet for this example. However, Ethereum boasts several testnet environments like Kovan, Ropsten, Rinkeby, and Görli. Because we’re using the Ropsten testnet, we can avoid using real ETH when laying out the initial iterations of our contracts. Instead, we’ll be using “play” ETH that we can obtain from the Ropsten faucet.
How to Develop a Cryptocurrency – What are ERC-20 Tokens?
Before we learn how to develop a cryptocurrency, let’s take the time to explore the type of tokens we’ll be creating. The term “ERC-20” refers to an Ethereum token standard that offers a uniform structure for creating tokens with the same properties. It dictates the rules, actions, and parameters that an Ethereum token or smart contract must adhere to and the steps it must take to do so. Further, the ERC-20 standard is the most widely-used token standard and is responsible for a large portion of the tokens on the market today.
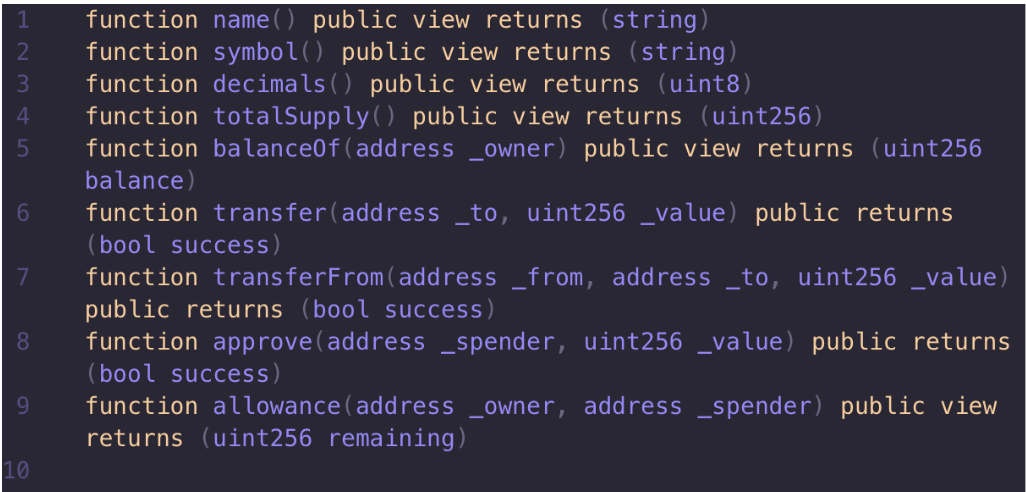
Accordingly, ERC-20 tokens are transferable from any Ethereum wallet address. Moreover, anyone creating an ERC-20 token must specify the total supply and be able to retrieve the token balance. In addition, an ERC-20 token must implement specific methods and events:

How to Develop a Cryptocurrency with Moralis
To create a cryptocurrency, we’re going to need a node, some ETH, and a MetaMask account. Also, we’ll be using the Brownie testing framework for this example. However, the process is similar when using Truffle Suite or Hardhat, so feel free to use the framework you’re most familiar with.
We’ll begin by connecting to an Ethereum node so that our software can communicate and interact with the Ethereum blockchain. In this example, our node provider is Moralis. Moralis Speedy Nodes are fast and reliable. Plus, they support Ethereum, Binance Smart Chain (BSC), Polygon, Arbitrum, etc. As such, you could transfer this step onto any of these networks.
If you haven’t already, you can go ahead and create a free Moralis account. After this, you’ll also need to download and install the MetaMask app or browser extension and create an account if you haven’t done this before. Also, you’ll need to send some ETH (or “play ETH”) to your MetaMask wallet.
Setting Up a Speedy Node
Let’s start by adding the Ethereum Ropsten testnet to our development framework. We do this by clicking on the “Speedy Nodes” tab on the left-hand side of the Moralis interface, as seen below:
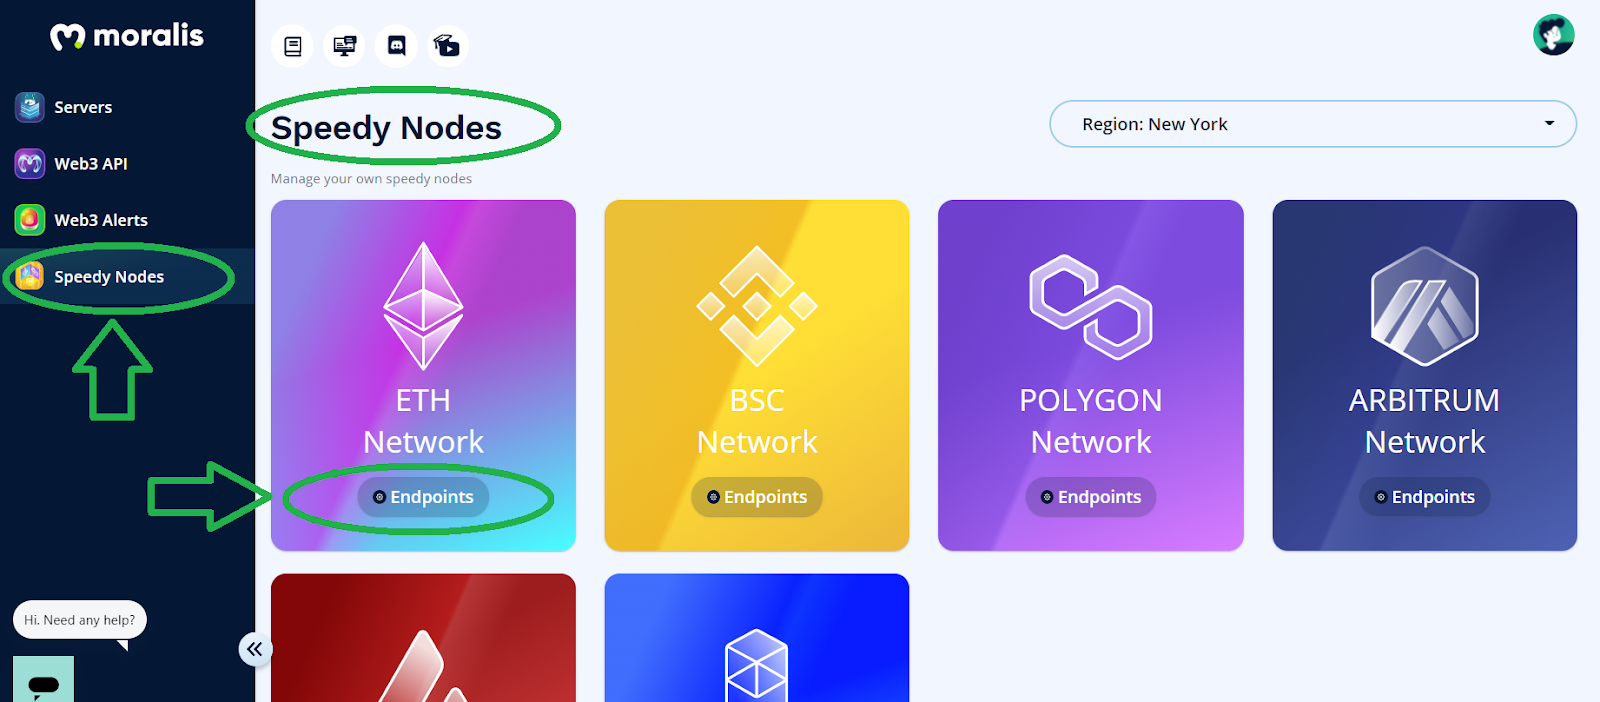
From here, multiple “Endpoint” options for various networks will appear. We want to select the one corresponding with the Ethereum network. Further, when clicking on the “Endpoints” button on the “ETH Network” tab, we’ll be presented with various options. However, because we want to use the Ropsten testnet, we simply copy the URL that corresponds with the Ethereum Ropsten testnet.
When using the Ropsten testnet (or any other Ethereum testnet) to create a cryptocurrency, you can obtain “play ETH” for testing smart contracts from the Ropsten faucet. Also, you can find the code for creating tokens on other blockchain networks in our GitHub repository. This includes Binance Smart Chain (BSC), Avalanche, Polygon, Fantom, and Arbitrum.
Initial Imports
Back in our development software, we want to paste the URL we just copied into the “network_setting.bash” file in our code editor (you can find this at the Moralis GitHub repository):
#!/bin/bash
brownie networks add Ethereum ropsten_test host='YOUR LINK' chainid=3 explorer='https://api-ropsten.exit'
We’re going to use Visual Studio Code (VSC) to create a file called “my_token.sol”. As seen in the image below, the contract of our token will be called “DanielToken”. So, inside the file/project, type in the code below by yourself or copy the code and amend the details:
// SDPX-License-Identifier: MIT
pragma solidity ^0.8.0;

import "OpenZeppelin/[email protected]/contracts/token/ERC20/ERC20.sol";


contract DanielToken is ERC20 {
    constructor(uint256 initialSupply) ERC20("Daniel", "Dan") {
        _mint(msg.sender, initialSupply);
    }
}
Preparing the Development Environment
Alternatively, we can prepare our development environment for our token contract starting from scratch. First, we will add a license identifier, followed by a pragma line. Then, we’ll import the correct OpenZeppelin package.

The license identifier allows us to mark our token’s licensing status. We’re going to use the free, open-source MIT license in this example. We do this by inputting the following into our code:
// SDPX-License-Identifier: MITFollowing this, we add our pragma line to identify the compiler we’re using. In this example, we can use any version above the 0.8.0 version to include the following in our code:
pragma solidity ^0.8.0;Finally, we need to import the correct OpenZeppelin packages. If you’ve used Brownie before, you can check to see which packages are already installed by typing “brownie pm list” in the terminal. This lists all the packages previously installed. If OpenZeppelin has not already been installed, we can type “brownie pm install xxx” and replace the “xxx” with the relevant OpenZeppelin version. After installing the package, we can go ahead and import our code using the line below:
import "OpenZeppelin/[email protected]/contracts/token/ERC20/ERC20.sol";Breaking Down the Code
In the first line of the code above, we define a license. The second line refers to our compiler. Furthermore, we have the “import” element that uses an OpenZeppelin ERC-20 token template. Skip to 2:45 in the video at the bottom of this article for instructions on installing the “[email protected]” contract packages.
Below “import”, we have three lines of code that we use to create our token. We’ll be using the name “DanielToken” for our example contract, but you can call this whatever you like. Following this, the “constructor” defines the initial supply of our token. Beside this is “Daniel”, the name of our token. Plus, we have “Dan”, which is our ticker. Again, you can change these as you please or keep them the same. Furthermore, the last line of our code ensures that our tokens are minted. Using OpenZeppelin, we can create a cryptocurrency using just three lines of code.
How to Develop a Cryptocurrency – Brownie
Before we move on to creating our token contract, we need to ensure that Brownie is set up correctly so that we can create a cryptocurrency. We do this by typing “brownie console” in the terminal of our editor. You can skip to 5:52 in the video at the bottom of this article for more info. However, you should be able to see a “Brownie environment is ready” message:

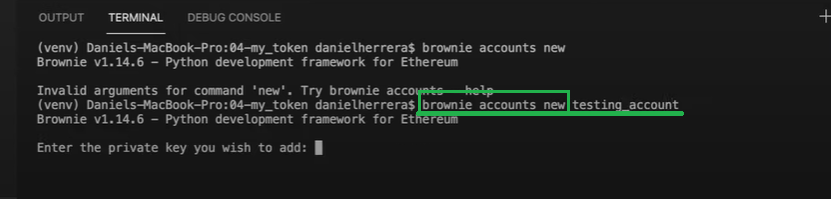
Also, we need to have an account prepared for deploying our tokens onto a live testnet. As you can see below, we use the commands “brownie accounts new”, followed by our account’s name (we used “testing_account”) in our terminal:
Export Private Key
In the image above, we can see that our terminal prompts us to provide a private key. We can export our private key from MetaMask by clicking on the “account” icon, followed by “Account details”:
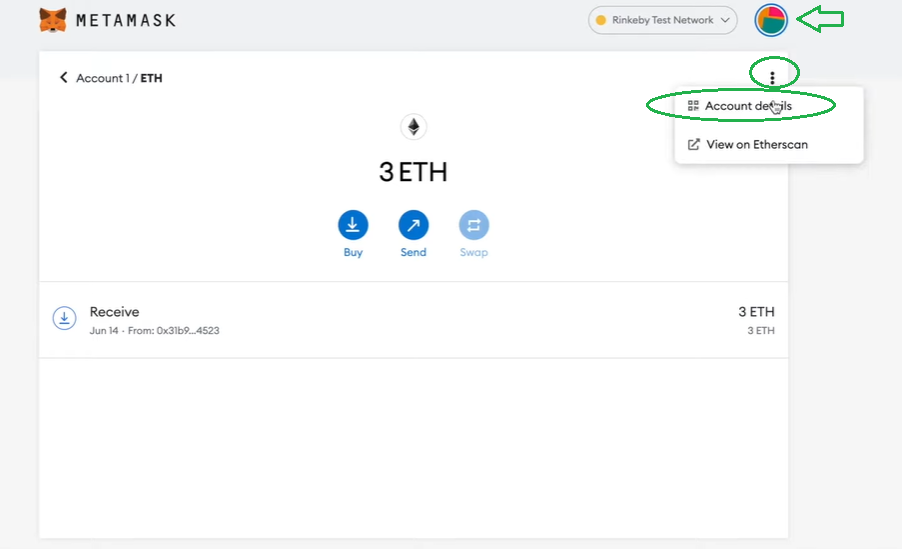
Next, we click on the “Export Private Key” button to reveal the private key. Now, we simply copy this and paste it into the terminal. Furthermore, you’ll need to create a password for your account, so be sure to memorize it or write it down:

Before we deploy our token, we need to ensure that it works correctly. We can do this by inputting “brownie console” into our terminal. When you see that the contract has been compiled properly, we know that everything is working as it should.
Creating the Contract
Now that we’ve completed our initial preparations, it’s time to create the contract that enables us to create a cryptocurrency. First of all, we need to enter “brownie console –network ropsten_test” into our command line:

Below, we can see “Brownie environment is ready”. This tells us that the project has been correctly uploaded to the Ropsten testnet. Following this, we need to load the MetaMask account we created in the previous step to deploy our tokens:
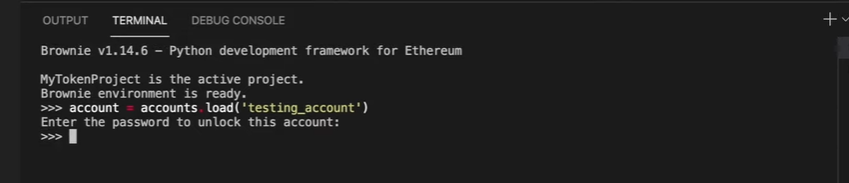
We are then prompted by the terminal for the password for our MetaMask account. Once we have entered this, we can move on to the final step of the deployment process:
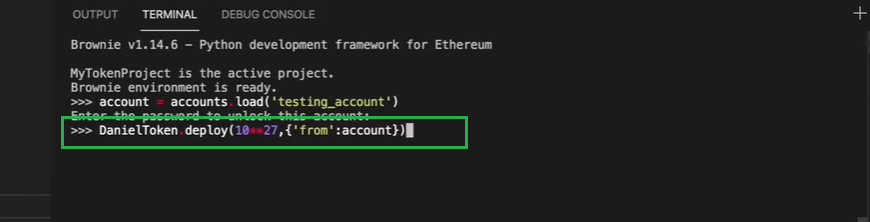
The image above shows that we’re using the name of our smart contract, “DanielToken”. Importantly, you should make sure that this corresponds with the name of your contract. Furthermore, our example shows that we will have an initial supply of one billion tokens, identified by the “10**27” part of our code, meaning ten to the power of twenty-seven. Although one billion is ten to the power of nine, we also need to account for eighteen decimal places. Accordingly, we reach ten to the power of twenty-seven, or “10**27”.
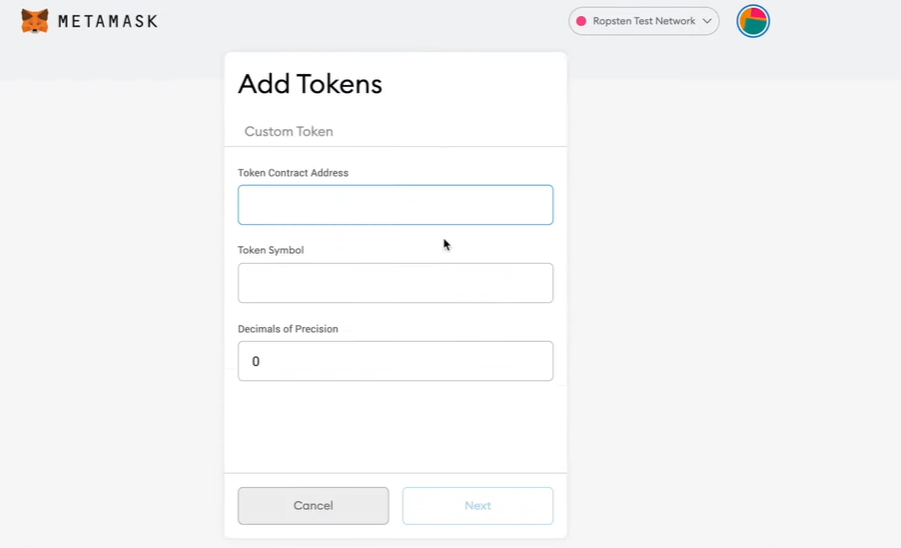
Add Tokens
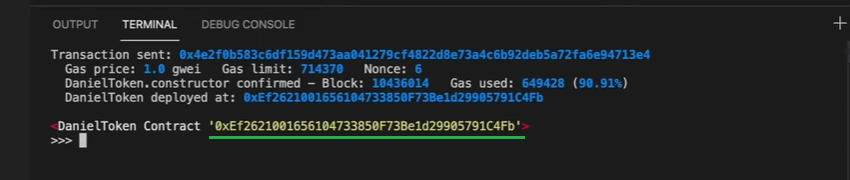
The “account” in the final line of our code tells the Brownie console that the currently logged-in account is the account we wish to use for deploying our tokens. Moreover, this is where we get our token contract address if everything is executed correctly:
We can now use the token contract address to see the balance using MetaMask. Open MetaMask and select “Ropsten Test Network”. Next, we click on “Add Token” and paste in our newly created token address. MetaMask will automatically add the number of decimals your token uses and the ticker. Now, click “Next”, followed by “Add Tokens”. You should now be able to see your newly created testnet tokens! Skip to 9:36 in the video below to watch the final stages of this example project!
That’s it! Now you know how to develop a cryptocurrency in minutes with Moralis! Also, don’t forget that you can use this knowledge to create a BEP-20 token on Binance Smart Chain (BSC) and other popular blockchain networks. Be sure to check out the relevant code snippets at our GitHub. In addition, you can follow the video below to develop a cryptocurrency alongside one of our Moralis experts:
How to Develop a Cryptocurrency: Summary
Now that you understand how to develop a cryptocurrency, why not check out some of the other walkthrough guides on the Moralis blog or on our YouTube channel? You can find detailed guides that teach you how to create a cryptocurrency on various blockchain networks. Plus, we provide a wealth of information to help you build all kinds of decentralized applications (dApps).
Furthermore, if you want to take your blockchain programming skills to the next level, check out the Smart Contract Programming 101 course at Moralis Academy! Also, check out our “What are NFTs?”, “Top Crypto Games”, and “What is the Metaverse?” articles to learn more about the emerging blockchain gaming industry!

Moralis Academy is the ultimate Web3 and blockchain education suite online. We provide expert-guided tutorials covering every area of the industry. Regardless of your current level of knowledge or experience, we have the perfect courses for you! No coding experience? No problem! Check out the JavaScript Programming for Blockchain Developers course to learn the basics! Start your blockchain journey today with Moralis Academy!


